
In this tutorial, we'll learn how to install Hubzilla on Ubuntu 24.04.
We’ll cover every stage—from installing the necessary packages and setting up PHP to configuring your database and performing the final Hubzilla installation. This guide is meant for individuals with a basic understanding of Linux server administration, but I’ll explain each step in detail so you feel confident every step of the way.
Introduction to Hubzilla
Hubzilla is a decentralized social media and web publishing platform. It offers tools for creating interconnected websites (called “channels”) with built-in privacy controls, file sharing, events, and more. One of Hubzilla’s strongest features is the ability to “nomadically” move your channel’s identity and data between different “hubs” (servers) in the network—giving you control over your online presence without relying on a single central server.
Prerequisites
Before proceeding, make sure you have the following in place:
- A Fresh Ubuntu 24.04 dedicated server or KVM VPS.
- Root or Sudo Privileges: You should have sudo privileges to install packages and make system-wide changes.
- A Valid Domain Name (Optional but Recommended)
How To Install Hubzilla on Ubuntu 24.04
1. Update Your System Packages
The first step is to ensure that your Ubuntu 24.04 server is fully up to date. This will reduce the chance of running into issues caused by out-of-date system packages.
Log in to your server via SSH or from the console.
Run the following commands to update the package index and upgrade installed packages:
sudo apt update
sudo apt upgrade -y
After the upgrade completes, it’s often a good idea to reboot your server if the updates include kernel upgrades:
sudo reboot
When your server comes back online, you’ll have a clean and updated system to continue with the installation.
2. Install Required Dependencies
Hubzilla requires a web server (commonly Apache or Nginx), a database (usually MariaDB or MySQL), PHP (with specific extensions), and Git to download the Hubzilla source code. We’ll use Apache and MariaDB in this tutorial as they’re straightforward to set up and well-documented for Hubzilla.
2.1. Install Apache Web Server
Apache is a reliable and widely-used web server. Install it using:
sudo apt install apache2 -y
Once installation completes, enable it to start on boot and verify that it’s running:
sudo systemctl enable apache2
sudo systemctl start apache2
sudo systemctl status apache2
If Apache is running correctly, you’ll see a green “active (running)” message. If you open your browser and go to your server’s IP address (for example, http://your_server_ip/), you should see the default Apache welcome page.
2.2. Install MariaDB (MySQL-compatible Database)
Next, install MariaDB—an open-source database server often used as a drop-in replacement for MySQL:
sudo apt install mariadb-server mariadb-client -y
Start and enable MariaDB:
sudo systemctl enable mariadb
sudo systemctl start mariadb
sudo systemctl status mariadb
Again, you should see it active and running.
2.3. Install PHP and Required Extensions
Hubzilla is written in PHP, so you’ll need to install PHP along with a series of extensions. On Ubuntu 24.04, you can install PHP 8.2 (the current stable version at the time of writing) or the version that Hubzilla recommends. Then include the extensions Hubzilla needs:
sudo apt install php php-common php-cli php-gd php-mbstring php-xml php-zip php-curl php-mysql libapache2-mod-php php-intl php-bcmath -y
The above command installs the main PHP package plus the commonly required extensions:
- php-gd: Image processing (used for image thumbnails, etc.)
- php-mbstring: String processing in different encodings (e.g., for extended text handling)
- php-xml: XML parsing functions (Hubzilla needs this for various features)
- php-zip: Handling ZIP files (needed to install or update certain add-ons)
- php-curl: Transfer data using various protocols (Hubzilla uses cURL for network requests)
- php-mysql: Connectivity with MariaDB/MySQL databases
- libapache2-mod-php: Ties PHP to your Apache server so that PHP code can run
2.4. Enable the Apache mod_rewrite Module
Hubzilla uses clean URLs, which require the mod_rewrite module:
sudo a2enmod rewrite
sudo systemctl restart apache2
This module enables Apache to rewrite URLs in a more user-friendly and SEO-friendly way.
3. Secure and Configure Your Database
Hubzilla needs a database to store user accounts, posts, settings, and more. We’ll create a dedicated database and user account for Hubzilla. First, secure your MariaDB installation:
Run the built-in security script:
sudo mysql_secure_installation
- You’ll be asked to enter a root password—choose a strong password or skip if not prompted.
- Answer “Yes” (Y) to all subsequent prompts to remove anonymous users, disallow remote root login, and remove test databases.
Log in to MariaDB:
sudo mysql -u root -p
Enter the root password you just set (or leave blank if you skipped password creation).
Create a database and a user:
CREATE DATABASE hubzilla_db DEFAULT CHARACTER SET utf8mb4 COLLATE utf8mb4_unicode_ci;
CREATE USER 'hubzilla_user'@'localhost' IDENTIFIED BY 'your_secure_password';
GRANT ALL PRIVILEGES ON hubzilla_db.* TO 'hubzilla_user'@'localhost';
FLUSH PRIVILEGES;
EXIT;
- Replace hubzilla_db with any name you prefer (keep it short and descriptive).
- Replace hubzilla_user with a username of your choice.
- Replace your_secure_password with a very strong password (include letters, numbers, and symbols).
You’ve now created a secure database and a user specifically for Hubzilla.
4. Configure PHP for Hubzilla
Although you’ve installed PHP, you should optimize some settings to ensure smooth performance with Hubzilla.
Edit the main PHP configuration file (often found at /etc/php/8.3/apache2/php.ini—the version directory might be different if you installed a different PHP version):
sudo nano /etc/php/8.3/apache2/php.ini
Adjust these parameters (search for them by pressing CTRL+W in nano):
memory_limit = 256M
upload_max_filesize = 16M
post_max_size = 16M
max_execution_time = 300
- memory_limit: How much memory a PHP script is allowed to consume. Setting it to 256M or higher ensures you can handle larger operations.
- upload_max_filesize and post_max_size: Control the maximum file upload size. 16MB is typical, but you can increase it if you expect larger media files.
- max_execution_time: Time in seconds a PHP script can run. 300 seconds is often enough for Hubzilla’s operations and plugin installs.
Save and exit the editor by pressing CTRL+O, then ENTER, and finally CTRL+X.
Restart Apache to apply these changes:
sudo systemctl restart apache2
5. Download and Install Hubzilla
Now that your environment is ready, it’s time to download Hubzilla. We’ll use Git to clone the official Hubzilla repository into Apache’s web root directory (commonly /var/www/html).
Install Git if you haven’t already:
sudo apt install git -y
Navigate to Apache’s web root:
cd /var/www/html
Clone the Hubzilla repository:
sudo git clone https://framagit.org/hubzilla/core.git hubzilla
This will create a hubzilla folder containing all the Hubzilla files.
Clone the “addon” repository inside the hubzilla folder** (some functionality depends on these add-ons):
cd hubzilla
sudo git clone https://framagit.org/hubzilla/addons.git addon
Set correct ownership and permissions so Apache can serve and modify files as needed:
sudo chown -R www-data:www-data /var/www/html/hubzilla
sudo find /var/www/html/hubzilla -type f -exec chmod 664 {} \;
sudo find /var/www/html/hubzilla -type d -exec chmod 775 {} \;
www-data is the default Apache user on Ubuntu.
6. Configure Apache for Hubzilla
To serve Hubzilla properly, you need a dedicated Apache configuration file. Let’s set one up:
Create a new Virtual Host file in /etc/apache2/sites-available:
sudo nano /etc/apache2/sites-available/hubzilla.conf
Add the following configuration, adjusting the ServerName and ServerAdmin lines to match your domain or server details:
<VirtualHost *:80>
    ServerAdmin admin@your_domain.com
    ServerName your_domain.com
    DocumentRoot /var/www/html/hubzilla

    <Directory /var/www/html/hubzilla>
        AllowOverride All
        Require all granted
    </Directory>

    ErrorLog ${APACHE_LOG_DIR}/hubzilla_error.log
    CustomLog ${APACHE_LOG_DIR}/hubzilla_access.log combined
</VirtualHost>
Save and exit the file. Then:
sudo a2ensite hubzilla.conf
sudo systemctl reload apache2
Test your configuration:
sudo apache2ctl configtest
If there are any syntax errors, the test command will show them. If everything is fine, you’ll see Syntax OK.
You can now access Hubzilla via your domain (e.g., http://your_domain.com) or server IP. However, before finalizing, let’s secure your domain with HTTPS.
7. Configure firewall
We need to allow HTTP or HTTPS ports in firewall.
ufw allow 80/tcp
ufw allow 443/tcp
8. Obtain an SSL Certificate (Recommended)
If you have a domain name pointed to your server’s IP, it’s highly recommended to set up HTTPS. One of the easiest ways is using a free Let’s Encrypt SSL certificate:
Install Certbot (Let’s Encrypt client):
sudo apt install certbot python3-certbot-apache -y
Obtain and install the certificate:
sudo certbot --apache -d your_domain.com -d www.your_domain.com
Follow the on-screen prompts to:
Agree to the Terms of Service.
Confirm your email.
If successful, you’ll see a message saying your certificates have been installed and renewed automatically.
9. Run the Hubzilla Web Installer
Now that your server environment is set up, you can finalize Hubzilla’s installation using its web-based installer:
Open your web browser and go to https://your_domain.com.
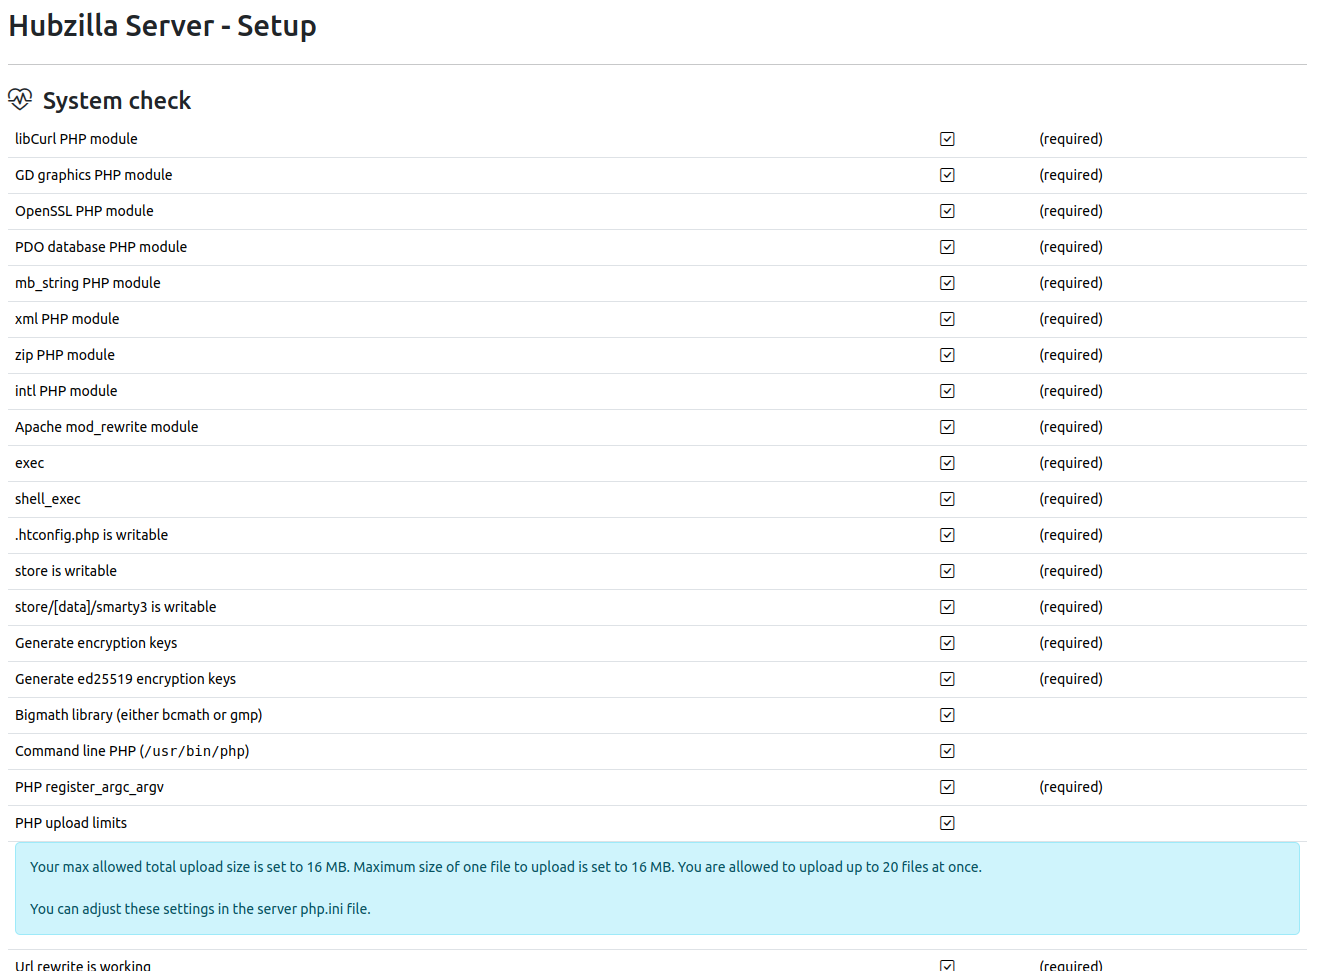
You’ll be presented with the Hubzilla Installer page, which will check your server environment.
Provide the following information on the installer page:
- Database server: Usually localhost.
- Database name: The one you created (e.g., hubzilla_db).
- Database user: The user you created (e.g., hubzilla_user).
- Database password: The password you set for that user.
- Site URL: The domain name or IP where you plan to access your Hubzilla site. If using HTTPS, include the https:// prefix.
- Admin email address: The email for the main administrator.
- Click Submit or Next to proceed. Hubzilla will create necessary tables in the database and ask you to create an admin account.
- Create your admin account. This account will have privileges to manage global settings on your Hubzilla instance.
After completing these steps, you should see a success message. Hubzilla is now installed!
10. Post-Installation Recommendations
Here are a few additional tips to ensure a smooth experience with Hubzilla:
Configure Cron Jobs: Hubzilla uses background tasks to perform routine maintenance, sending notifications, etc. Add a cron job by editing your system’s cron tab:
sudo crontab -u www-data -e
Then add the following line:
*/10 * * * * cd /var/www/html/hubzilla; php Zotlabs/Daemon/Master.php Cron > /dev/null 2>&1
This will run the Hubzilla Cron job every 10 minutes.
Set Up Correct File Permissions: Periodically ensure that your store directory, used for file/media uploads, has proper permissions for the Apache user (www-data). You can do this as follows:
sudo chown -R www-data:www-data /var/www/html/hubzilla/store
This ensures that uploaded files can be stored and accessed without errors.
Stay Updated: Hubzilla is actively developed, and updates can bring new features, fix bugs, or patch security vulnerabilities. Update regularly:
cd /var/www/html/hubzilla
sudo git pull
sudo -u www-data php util/udall
- git pull fetches the latest code from the repository.
- util/udall updates both the core and add-on repositories plus runs any needed database updates.
Because Hubzilla holds your social posts, contacts, and other important data, make frequent backups:
- Database backups using mysqldump.
- File backups for the entire Hubzilla directory, especially /store, .htconfig.php, and any custom themes.
Conclusion
Congratulations—you’ve successfully installed Hubzilla on your Ubuntu 24.04 server! Your new hub is now equipped to serve as a powerful social media and web publishing platform. By following the steps above, you’ve established a secure and up-to-date environment, configured a database, installed the necessary PHP dependencies, and set up Hubzilla with HTTPS.
Maintaining an open yet privacy-focused community is now in your hands. With regular updates, backups, and the occasional tweak to performance and security settings, your Hubzilla server can stay healthy for years to come.
Enjoy your new decentralized social platform! If you ever run into questions or need additional help, the Hubzilla Project community forums and documentation are great places to start.
