
In this tutorial, we'll learn how to deploy Node.js app in cPanel.
Deploying a Node.js application on cPanel might seem challenging at first—especially if you're accustomed to traditional PHP hosting environments—but this tutorial is here to break down the process into clear, manageable steps. Whether you’re a seasoned IT professional or new to server management, this guide provides a deep dive into every aspect of the deployment process, ensuring you understand not only how to execute each step but also the reasoning behind them.
In this tutorial, you'll learn how to prepare your hosting environment, configure the necessary settings, and get your Node.js app up and running on a cPanel server. We’ll cover everything from checking prerequisites and uploading your files, to installing dependencies and configuring environment variables. You'll also discover essential practices for testing, troubleshooting, and even automating future deployments.
By the end of this guide, you'll have the skills to deploy a robust, production-ready Node.js application on cPanel, with a clear understanding of the steps involved and the best practices to keep your app secure and maintainable.
Prerequisites:
- A cPanel web hosting account.
- Node.js application code ready.
How To Deploy Node.js app in cPanel
Step 1: Verify Prerequisites and Environment
Before you start, ensure you have the following:
- cPanel Access: You need a hosting account with cPanel and a Node.js-supported environment. We offer Node.js support via CloudLinux’s Node.js Selector.
- Node.js Version: Know which Node.js version your app requires. cPanel usually allows you to choose the version when setting up your application.
- Application Code Ready: Your Node.js app should be complete with a valid package.json file and a clearly defined startup file (commonly named app.js or server.js).
- Domain/Subdomain Configuration: Confirm your domain or subdomain is set up correctly if you plan to route traffic there.
- FTP/SFTP or File Manager Access: You’ll need a way to upload your app files to your server.
Understanding these prerequisites ensures you’re prepared and prevents unexpected issues later on.
Step 2: Uploading Your Application Files
Using cPanel File Manager or FTP:
- File Manager: Navigate to the “File Manager” in cPanel. Go to the directory you specified as your Application Root and upload your files there.
- FTP/SFTP: Alternatively, use an FTP client (like FileZilla) to connect to your server and transfer your files.
- Ensure Complete Upload: Make sure that all necessary files are included, especially the package.json file (which lists your dependencies) and your startup script.
Uploading your files into the correct directory is vital because it aligns your codebase with the environment settings you configured earlier.
Step 3: Accessing cPanel and Locating the Node.js App Manager
Log In: Open your web browser and log in to your cPanel account using your credentials.
Find the Node.js App Tool: Scroll through the dashboard until you locate the “Setup Node.js App” icon. This tool is typically found in the “Software” section.
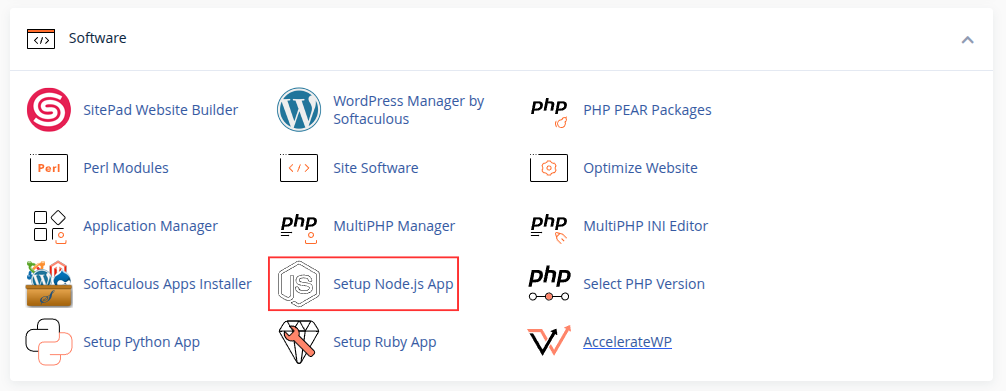
The Node.js App Manager is a specialized interface that allows you to configure the runtime environment, set environment variables, and manage the application process—all without needing to dive deep into command-line configurations.
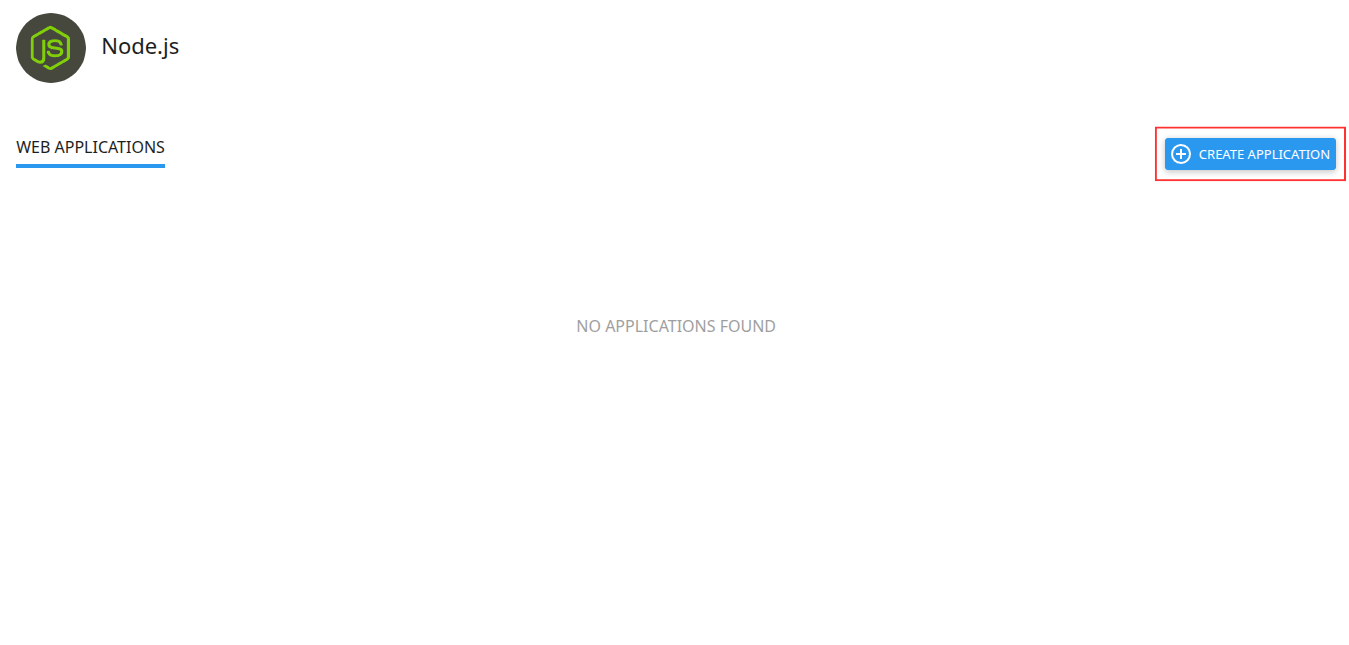
Step 4: Creating Your Node.js Application in cPanel
Initiate the App Creation: Click on the “Setup Node.js App” icon, then click on the “Create Application” button.
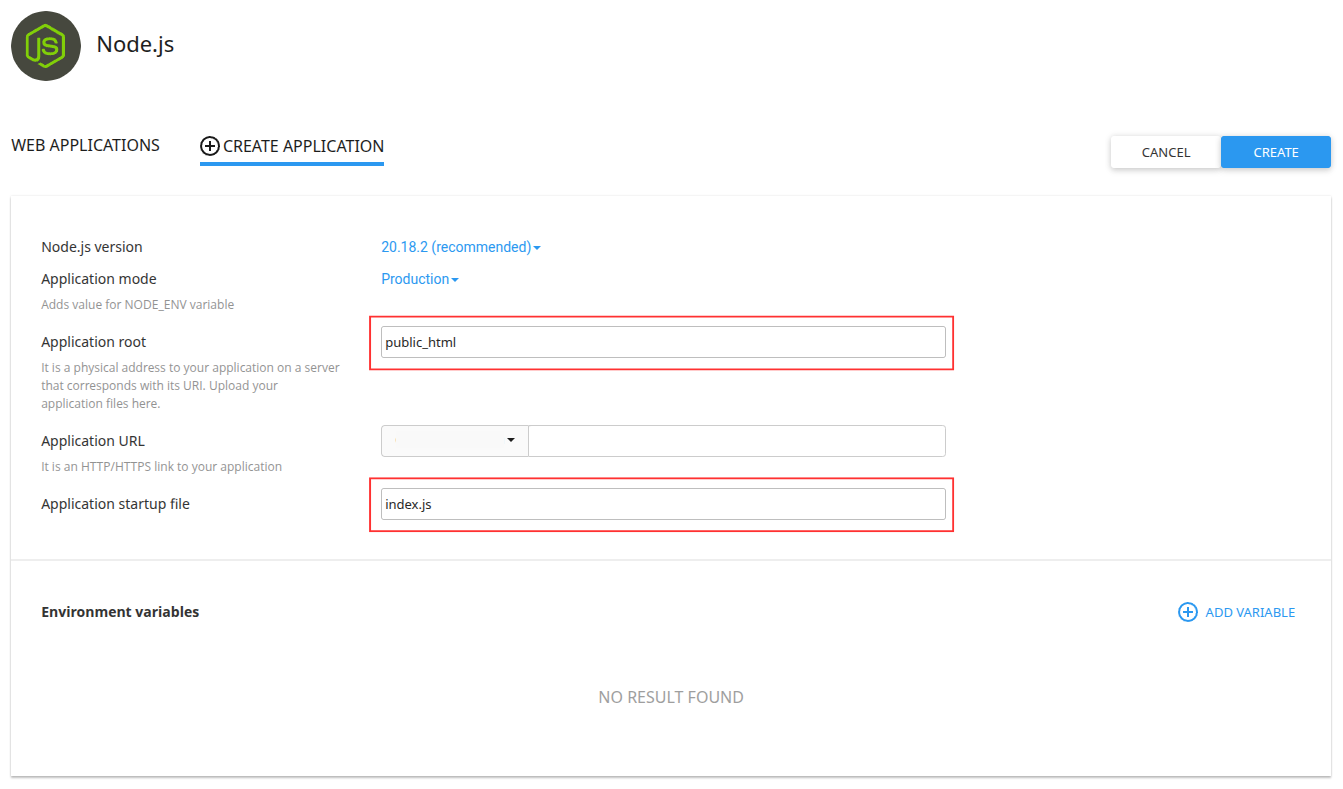
Choose the Node.js Version: From the dropdown menu, select the version that matches your development environment (for example, Node.js 16.x or 20.x).
Select Application Mode:
Development: Use this mode when you’re still testing features; it typically enables more verbose logging.
Production: Switch to production mode for live deployment to benefit from performance optimizations and reduced logging.
Define the Application Root: This is the directory where your app’s files will reside. You might choose something like /home/yourusername/nodeapp.
Specify the Application URL: This URL (or subdomain) is what users will visit. For example, if you set it as nodeapp.mydomain.com, ensure that your DNS records are properly configured.
Enter the Startup File: Provide the filename that starts your application (e.g., app.js or server.js). This file will be executed to run your app.
Confirm and Create: After entering all details, save the configuration. This action creates a tailored environment for your Node.js app on your hosting account.
This setup step is crucial because it informs cPanel how to handle your Node.js processes and what environment settings to use.
Sample Index.js
Here is the index.js we have used as a Application startup file:
const http = require('http');

const hostname = process.env.HOST || '0.0.0.0';
const port = process.env.PORT || 3000;

const server = http.createServer((req, res) => {
    res.statusCode = 200;
    res.setHeader('Content-Type', 'text/plain');
    res.end('Hello, World!\n');
});

server.listen(port, hostname, () => {
    console.log(`Server running at http://${hostname}:${port}/`);
});
Step 5: Installing Dependencies
Accessing the Terminal or Using the cPanel Interface:
- cPanel Terminal/SSH: Open the terminal (or connect via SSH) and navigate to your Application Root directory.
- cPanel’s Interface: Many Node.js App managers include an option to run commands directly.
Run npm Install: Execute the command:
npm install
This command reads your package.json file and installs all required modules into a node_modules directory.
Verify Successful Installation: Check the output to ensure that there are no errors. Dependency issues here can cause your app to fail later on.
This step is essential because Node.js relies on external modules. Installing them correctly ensures your app functions as intended.
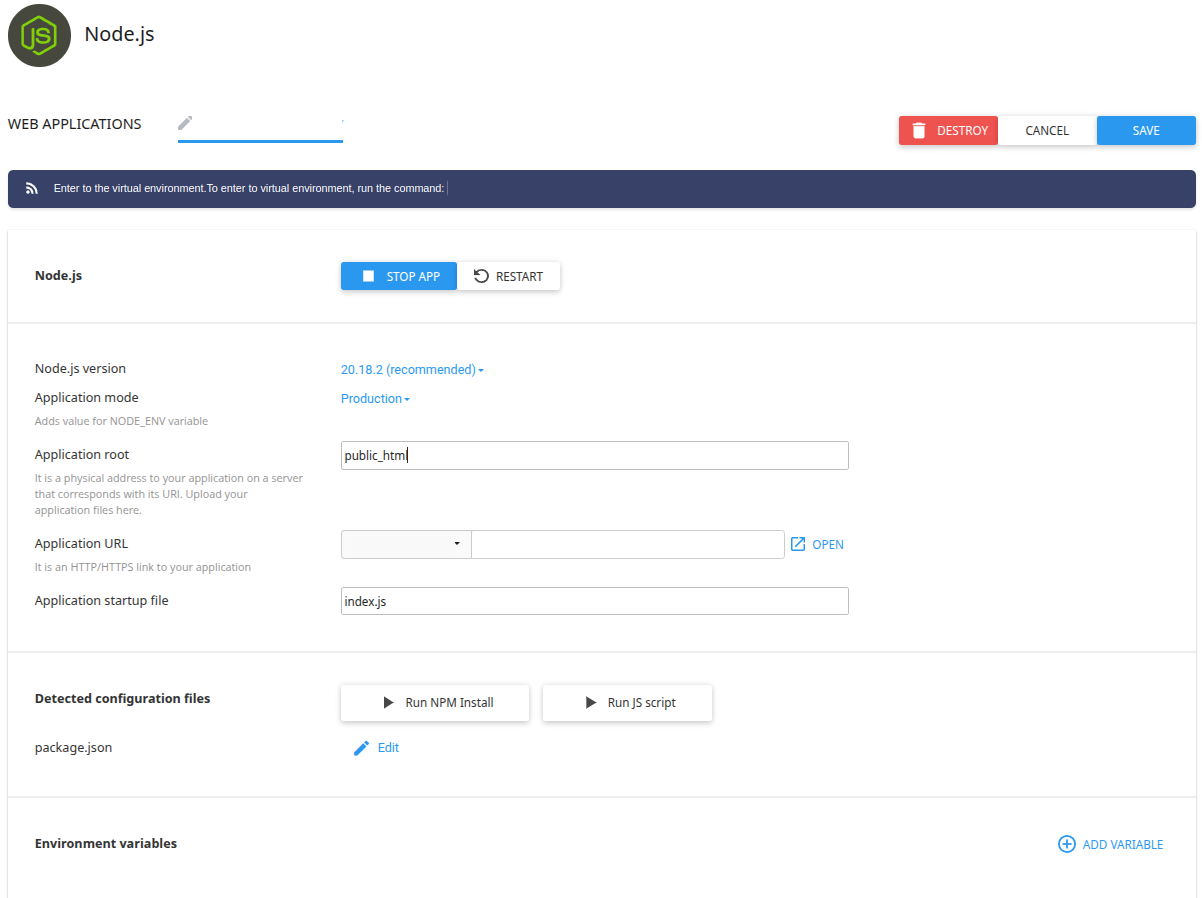
Step 6: Configuring Environment Variables and Additional Settings
Locate the Environment Variables Section: Within the Node.js App Manager, look for a section dedicated to environment variables.
Set Critical Variables:
- PORT: While cPanel may assign a port automatically, you might need to reference it in your code (often via process.env.PORT).
- NODE_ENV: Set to production for live deployments, which can affect logging and performance.
- Custom Variables: If your app requires API keys, database URLs, or other configuration settings, add them here.
- Save Changes: Ensure you save the updated configuration. These variables are loaded into your application at runtime and help maintain a separation between code and configuration.
Proper environment configuration is important for both security and flexibility. It allows you to change settings without modifying the codebase.
Step 7: Starting (or Restarting) Your Node.js Application
Start Your Application: In the Node.js App Manager, click the “Run” or “Start” button. If your app was already running, you might need to click “Restart” to apply any changes.
cPanel Process Handling: cPanel will then create a process using the defined startup file, setting up your Node.js runtime environment.
Monitor the Process: Look for any messages or logs that indicate whether your application has started successfully.
This step moves your application from a static codebase into an actively running service accessible to users.
Step 8: Testing and Troubleshooting Your Deployment
Access the Application URL: Open your browser and navigate to the URL you set up (e.g., nodeapp.mydomain.com).
Check for Errors:
- If the app isn’t loading, return to the Node.js App Manager and review the logs.
- Common issues include port binding errors, missing modules, or misconfigured environment variables.
Use cPanel Logs and SSH:
- cPanel often provides error logs and process logs directly in the interface.
- If you have SSH access, you can use commands like tail -f on log files to monitor real-time output.
Thorough testing ensures that your app is stable and that any issues are caught early.
Step 9: Security and Best Practices
File Permissions and Ownership: Ensure that your application files have the correct permissions to prevent unauthorized access.
Use Environment Variables for Secrets: Never hardcode sensitive information like API keys or database credentials directly in your code.
Regular Updates: Keep both Node.js and your dependencies updated to patch known vulnerabilities.
Error Handling and Logging: Implement comprehensive error handling in your application and maintain logs for monitoring purposes.
Backups: Regularly backup your application and its configurations. cPanel usually offers backup utilities that you can schedule.
These practices not only protect your application from security vulnerabilities but also improve reliability and maintainability.
In this tutorial, we've learnt how to deploy Node.js app in cPanel. By following these detailed steps, you should be able to deploy your Node.js app on cPanel successfully. Each stage of the process—from preparing your environment to managing deployments and ensuring security—is designed to give you both a working app and a robust understanding of how deployment works in a cPanel environment.
